Setting up your Spot-On Sundial
Please visit our new website here with an updated setup page
Before setting up your Spot-On Sundial, please read the pages on
"Finding the time of local noon" and
"Finding your latitude and longitude"which
you will need to set up your sundial accurately.
|
|
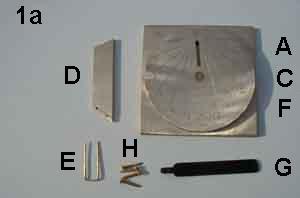
Unpack the box carefully and check the items listed
are all present
- A, C and F - the circular dialplate (A) attached to the square
baseplate (C) with the centre screw (F)
- B - these instructions (not shown in picture)
- D - the gnomon made of two plates with a narrow air gap
- E - the gnomon retaining clip,
- G - the tightening tool
- H - 4 brass screws for attaching the square baseplate to a plinth
or stand.
|
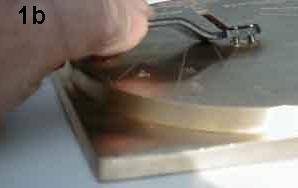
Place the two lugs on the tightening tool into the holes
on the centre screw, and rotate it anti-clockwise. (It helps to
put your other hand on the tightening tool above the centre screw
to prevent the lugs from disengaging). After a few turns, you will
be able to turn the centre screw by hand, remove it completely,
and separate the circular dialplate (B) from the square baseplate
(A).
|
|
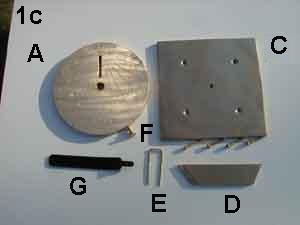
You now have the 6 components of the sundial and the 4 tightening
screws as shown in the illustration and identified by the letters
in panel 1c above.
If you have model E (San Francisco) , F (Los Angeles),
or G (New Orleans you should place the centre screw back in the
hole in the centre of the dialplate, and secure it with a piece
of tape before proceeding to step 2. You need to do this because
the low angle of the gnomon on these models will not permit you
to insert the centre screw with the gnomon in place as described
in step 6
|
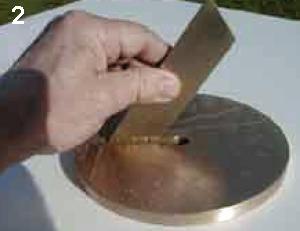
Hold the gnomon as shown and slide the thin end with the
two holes into the dialplate, so that it is slanting towards the
centre as shown. The gnomon is a tight fit in the dialplate, in
order to ensure it is at the correct angle. It is best to start
with the acute angle, and then "rock" the inner angle into position.
|
|
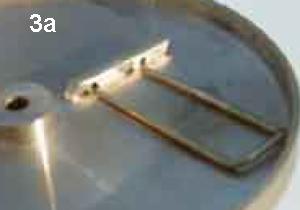
Turn the sundial over. The two holes in the gnomon should
both be clear of the baseplate. Position the gnomon retaining clip
so that the "arms" are flat on the baseplate, and the "hoop" is
raised off the baseplate as shown in panel 3a. Then slide the clip
through the two holes in the base of the gnomon.
|
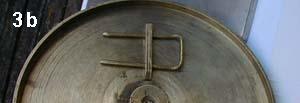
Push the gnomon retaining clip into the holes as far as is
possible by hand. (The arms are very slightly tapered to ensure
a tight fit.)
|
|
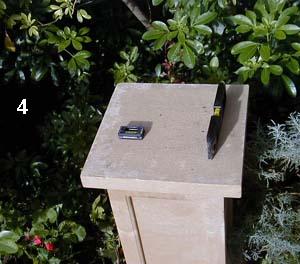
Set up the plinth on which the sundial will rest. Ensure
that it is completely level in 2 directions at right angles to each
other. It is worth taking trouble with this since the accuracy of
your sundial depends on it. (it is particularly important to get
it level in the east-west plane, since an error of 1 degree in the
level will lead to an error of 5 minutes or more in the reading;
an error of 1° in the north-south plane will only result in
an error of 2 minutes or so)
|
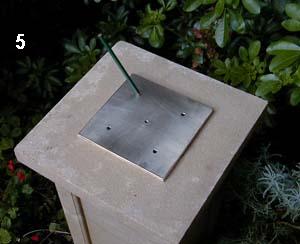
Place the baseplate in the desired position on the plinth,
and mark the position of the screws on the plinth using a pencil
through the screw holes on the baseplate.
If you are certain that your plinth is level to within
½°and you want to compensate for the small difference
between the latitude stamped on the dial and your actual latitude,
so that you get the maxim mum possible accuracy from your Spot-On
Sundial, you should read now our advanced
setup page.
|
|
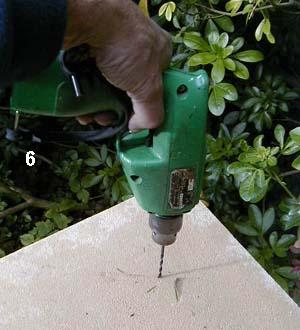
Drill out the screw holes in the plinth.
|
Screw the baseplate down onto the plinth with the 4 screws. Place
the dialplate on top of the baseplate, and line it up so that the
centre screw will pass through the dialplate and locate in its correct
position in the baseplate. Insert the centre screw and tighten it
by hand, leaving the dialplate free to rotate.
|
|
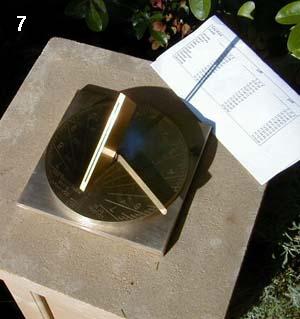
For the final stage of the setup
1. Set your watch accurately by a radio time signal.
2. Find out the time of solar noon at your
location using our unique Solar Noon Calculator.
3. When your watch reaches the exact time of Solar Noon, rotate
the dialplate until the shaft of sunlight shining through the slit
in the gnomon lies exactly along the dotted noon line. Then tighten
up the centre screw further with the aid of the tightening tool.
Your sundial is now set.
4. Please look at the pages on Reading the
Spot-On Sundial and on Looking after your
Spot-On Sundial if you have not already done so.
5. We have recently developed SNAP! - the sundial app.
Follow the link and select your country and a city near you.
SNAP! will show you a which produces a sundial face with the shadow
in the correct place and also a red line indicating clock time
at your selected place.
6. You will find much more information about all aspects of sundials on Sundials.co.uk
|
|